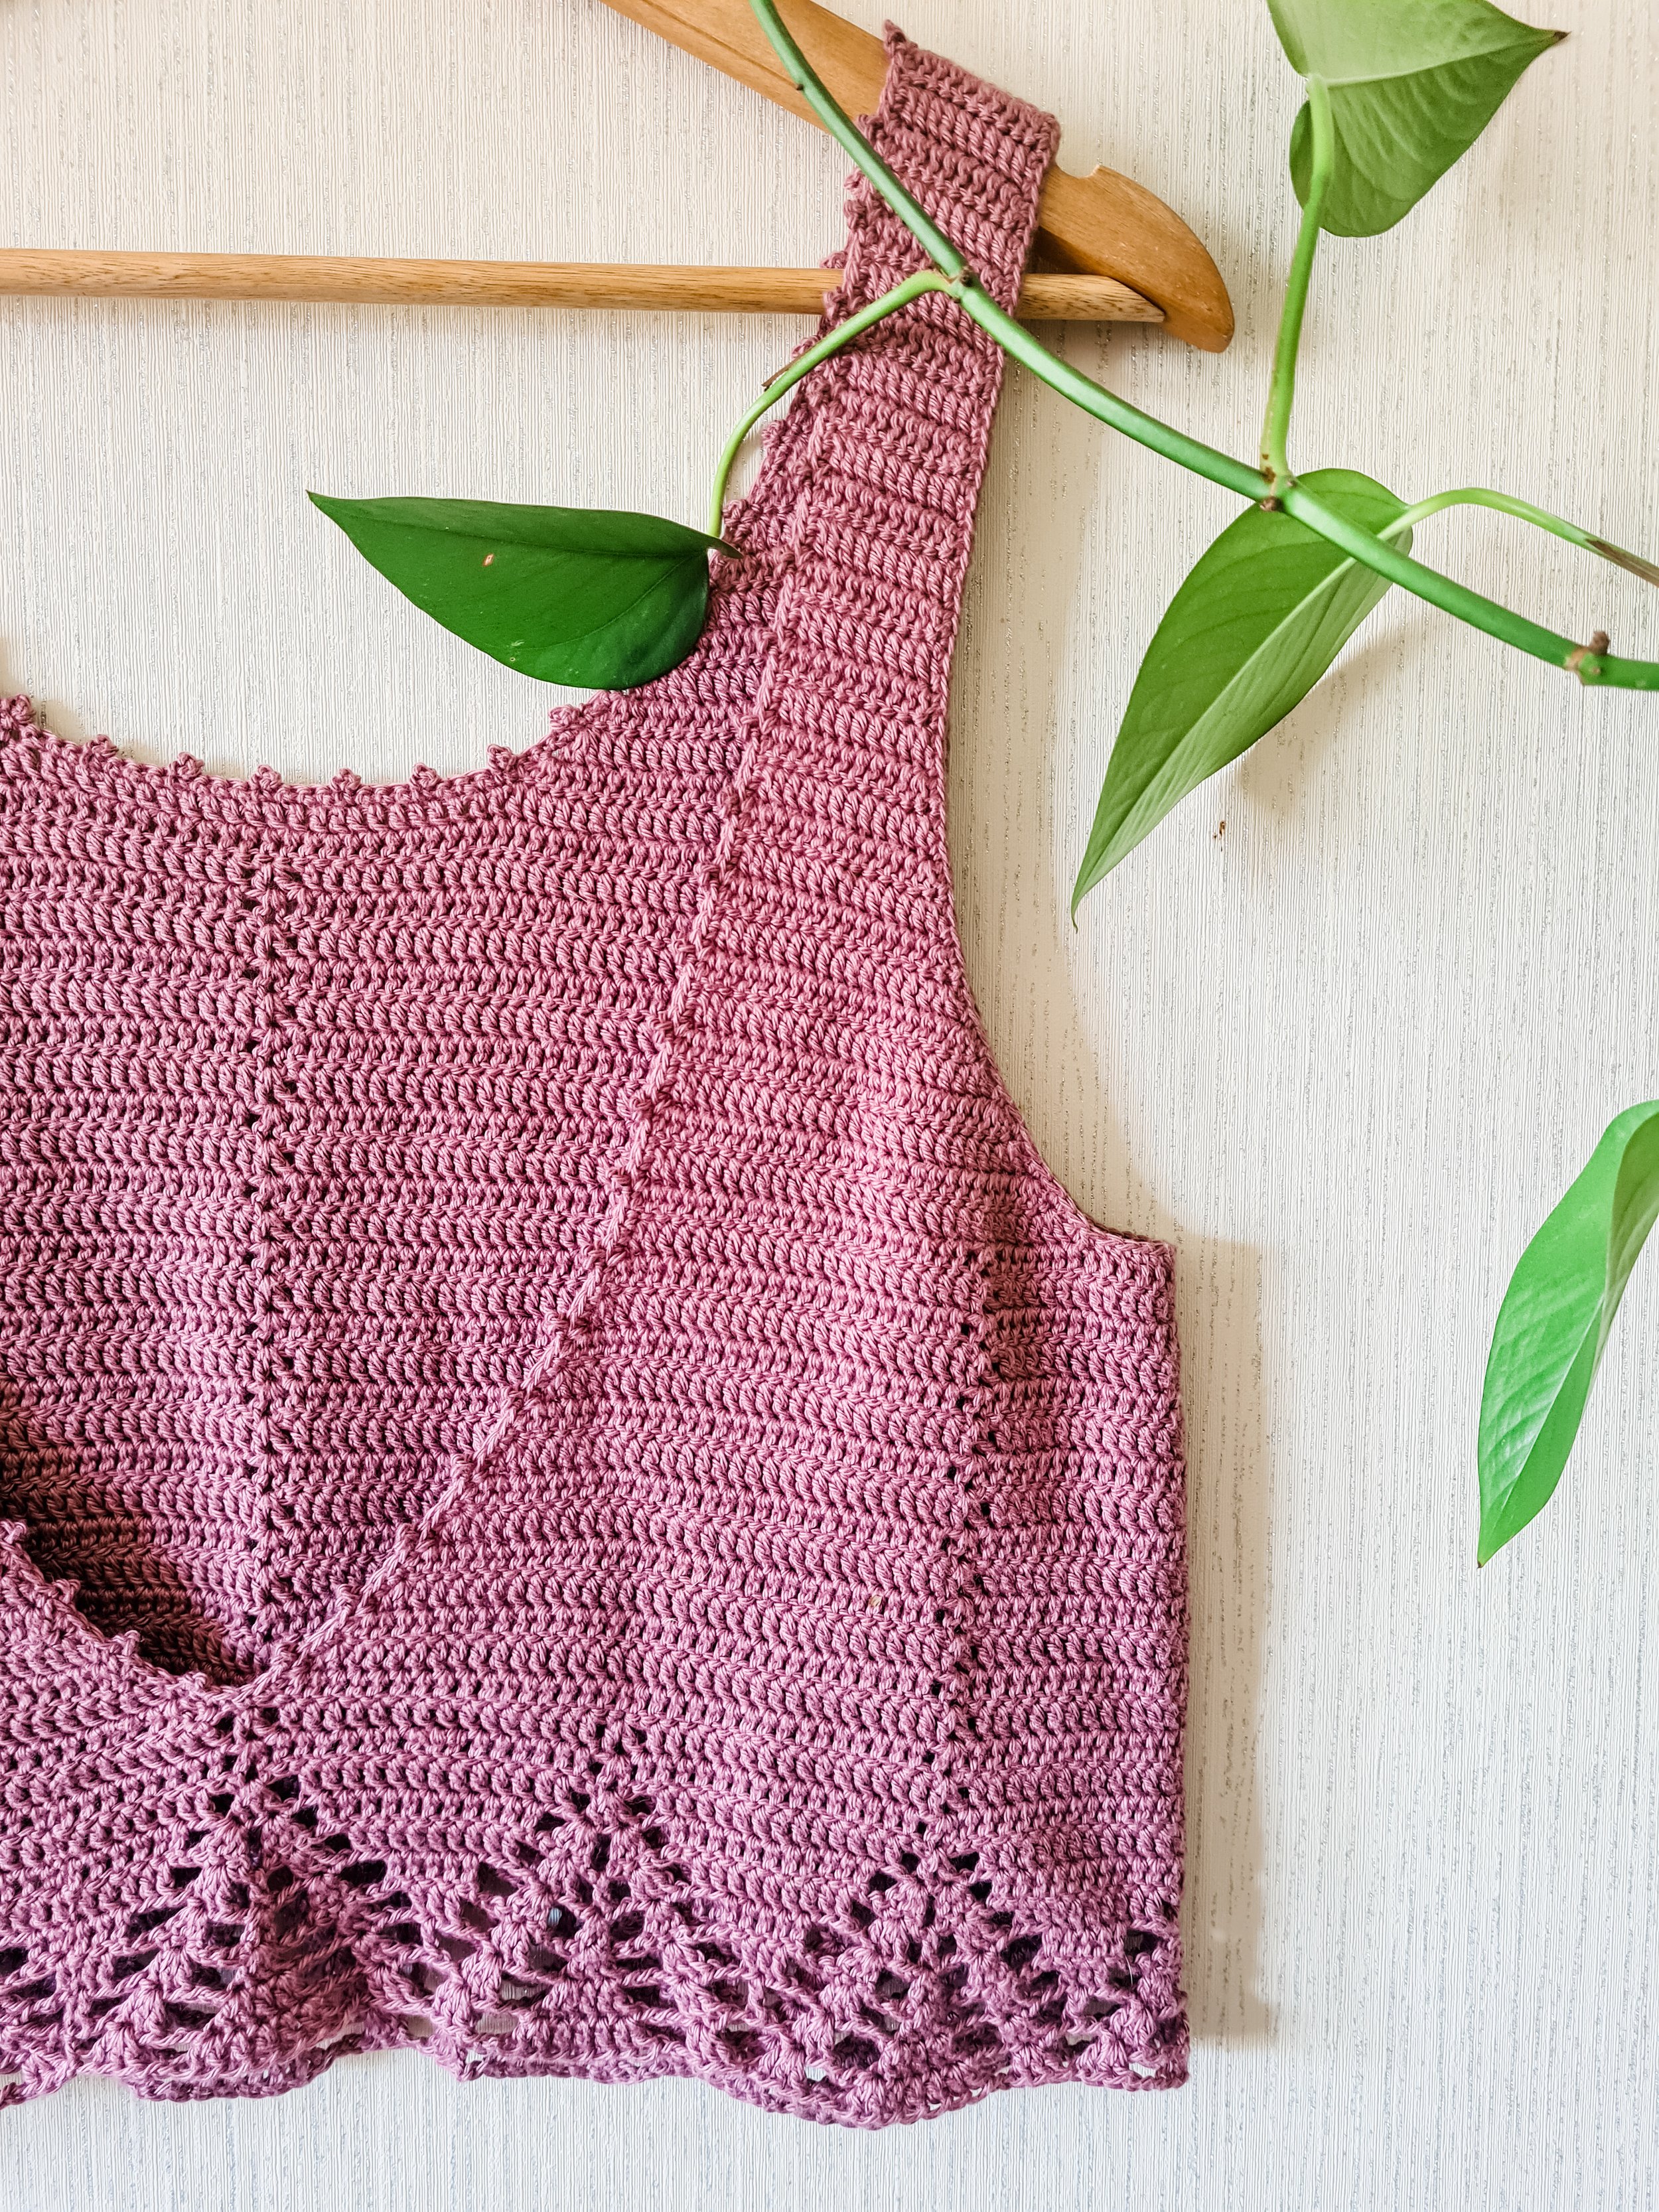
Snowdrops Cami - FREE pattern
Summer is my favorite season of the year. It allows me to be more creative with my clothing choices and also get to work on smaller and quicker knit and crochet projects!
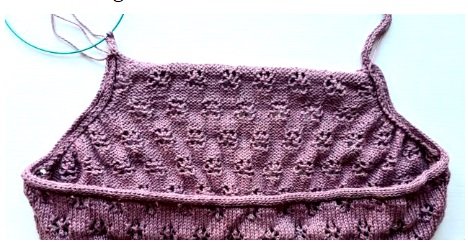
The Snowdrops Cami came from my desire to make something quick and to use up some left over yarn. Do you recognize that color? It’s the same one I used on my Secret Garden top! But as most of you know, knitting uses up A LOT less yarn than crochet, so I was able to complete my Snowdrops Cami with what I frogged from the Secret Garden lace plus a tiny bit more!

Let me tell you a little bit about the Snowdrops Cami!

When I lived in Bulgaria, winters were tough. It would snow so heavily that the whole world would turn white. But snowdrops (the flowers that are the namesake of this design) were the first to peak through the snow and announce the arrival of Spring. So snowdrops signify hope and warmth to me, the perfect companion to Spring and Summer vibes.
Snowdrops is constructed top-down, completely seamlessly. It features a delicate but very easy to memorize lace pattern throughout. It is highly adjustable as straps may be crossed at back, with adjustable ties or even worn as a halter top. Length can also be modified to be as long as desired.
The pattern is completely free on this page. But if you would like to support me further, you can purchase the ad-free color-coded PDF pattern HERE.

Please share your work on social media using the hashtags
#SnowdropsCami and #MyNomadMake
About Snowdrops
Skill Level
Intermediate
Sizes + Measurements
This pattern comes in 9 different sizes. The instructions for each size are in the order shown here: 1 (2, 3, 4, 5) (6, 7, 8, 9).
When choosing a size, it is recommended to consider the finished measurements of the garment and desired ease.

These are the approximate measurements of the finished item:
Bust1: 80 (92, 100, 112, 120) (132, 140, 152, 160) cm / 31½ (36¼, 39½, 44, 47¼) (52, 55, 60, 63) in
Shoulder-to-shoulder width: 25.5 (26.5, 29.5, 32.5, 34.5) (36.5, 36.5, 36.5, 38.5) cm / 10 (10½, 11½, 13, 13½) (14½, 14½, 14½, 15½) in
Length from underarm2: 25 cm / 9¾ in cropped; 35.5 cm / 14 in hip length
1to be worn with 6 - 12 cm / 3¼ - 4¾ in of positive ease
2Adjustable to taste.
Sample is Size 4 cropped and model measures 100 cm / 39¼ in around bust.
Materials
YARN: Fingering or light sport weight yarn (size 1 or 2)
Approx 290 (335, 365, 410, 440) (490, 520, 560, 600) m / 315 (365, 400, 445, 485) (535, 565, 615, 655) yds for a cropped cami; 430 (500, 540, 605, 650) (720, 760, 825, 875) m / 470 (540, 590, 660, 710) (790, 835, 900, 960) yds for a hip-length cami.
Amounts include 5% extra for swatching and margin of error.
Sample used Pascuali, Cumbria (60% Pima Cotton, 40% Bamboo Viscose; 50g - 150 m / 164 yds) in color Rose Quartz 345. 2 (3, 3, 3, 3) (4, 4, 4, 4) balls for a cropped cami; 3 (4, 4, 4, 5) (5, 6, 6, 6) balls for a hip-length cami
NEEDLES: 3.5 mm (80 cm / 32 in cable) circular needles; 4 mm and 4.5 mm dpns for I-cords.
NOTIONS: Stitch markers, tapestry needle, waste yarn or stitch holders
Alternative yarns
Any fingering or light sport weight yarn will work, but here are some I recommend based on weight and composition:
DMC Natura, Just Cotton (100% Cotton)
Scheepjes, Bamboo Soft (50% Bamboo, 50% Cotton)
MillaMia, Naturally Baby Soft (50% Cotton, 50% Soy)
KnitPicks, Comfy Fingering (75% Pima Cotton, 25% Acrylic)
Lion Brand, Cotton Bamboo Linen Yarn (40% Cotton 35% Bamboo 25% Linen)
Gauge
20 sts and 32 rows = 10 cm / 4 in worked in pattern with 3.5 mm needle.
Patt for gauge: cast on multiples of 8 + 7 sts. Work 2 rows of Stockinette.
Row 1 (RS): K5, skpo, yo, k1, yo, k2tog, *k3, skpo, yo, k1, yo, k2tog; rep from * to last 5 sts, k5.
Row 2 (WS) and every alt row: Purl.
Row 3: K6, yo, sl2, k1, p2sso, yo, *k5, yo, sl2, k1, p2sso, yo; rep from * to last 6 sts, k6.
Row 5: As row 1.
Row 7 - 10: Work 4 rows of Stockinette.
Row 11: K1, skpo, yo, k1, yo, k2tog, *k3, skpo, yo, k1, yo, k2tog; rep from * to last st, k1.
Row 13: K2, yo, sl2, k1, p2sso, yo, *k5, yo, sl2, k1, p2sso, yo; rep from * to last 2 sts, k2.
Row 15: As row 11.
Row 17 - 20: Work 4 rows of Stockinette. Rep from Row 1.
Be sure to block and check gauge before starting by making a big enough gauge swatch (at least 15 x 15 cm).
Certain materials might sag, and fabric will extend with drape, so adjust needle size appropriately.
ABBREVIATIONS (US)
BO: bind off
BOR: beginning of round
CO: cast on
cont: continue
k: knit
k2tog: knit two together (dec1)
kwise: knitwise
LHN: left hand needle
M1R: Make one right (See Special Techniques)
M1L: Make one left (See Special Techniques)
p: purl
pm: place marker
p2sso: pass two slipped stitches over
rep: repeat
RHN: right hand needle
RS: right side
sl: slip
skpo: slip kwise, knit, pass slipped st over (dec1)
st(s): stitch(es)
St st: Stockinette Stitch
WS: wrong side
wyib: with yarn at back
wyif: with yarn in front
yo: yarn over
NECESSARY SKILLS
work in the round
knit & purl
certain increases and decreases (see Special Techniques)
pick up sts to work around edges
I-cord and I-cord bind off
Provisional Cast On (I recommend this technique)
SPECIAL TECHNIQUES
M1R: Make 1 st leaning to the right
Use the left needle to pick up the strand between the last stitch you knit and the one you’re about to knit, bringing the needle from back to front. Leave the strand on the left needle. Next, insert the tip of the right needle knitwise into the front leg of the strand and knit as usual.
M1L: Make 1 st leaning to the left
Use the left needle to pick up the bar between the stitch you knit and the one you’re about to knit, bringing the needle from front to back. Next, insert the tip of the right needle knitwise into the back leg of the strand and knit as usual.
Sl2, k1, p2sso
A two st decrease: slip 2 sts kwise, knit 1, pass two slipped sts over the knit st.
4-st I-cord
CO4 sts onto DPN, *k4, sl 4 sts to other end of needle and change to LHN; rep from * until desired length.
4-st I-cord Bind Off
If working in rounds, at end of last round, change to larger RHN and CO 4 sts onto it. *Sl 4 sts to LHN wyib, pull tightly, k3, sl1 kwise, k1, psso; rep from * until there are no longer any sts left to BO.
Cut yarn and graft the last 4 sts on RHN with first 4 sts of I-cord BO using a tapestry needle.
Find I-cord bind off tutorial HERE.
PATTERN NOTES
Snowdrops is made top-down, starting at the front. A 4-st I-cord is started with a provisional CO and is made as wide as the top of the chest. Sts are picked up from it to create the chest. Here’s a handy tutorial for how to pick up sts from an I-cord.
After working the chest straight for a few rows, underarm shaping starts by increasing at the sides of RS rows. As sts increase at the sides, you will need to expand the pattern to fit another lace patt rep as necessary. At the same time, the lace stitch pattern is established and must be respected throughout. There’s a chart included at the end of the pattern to support the written lace instructions.
Once the front has reached the right length and width, sts are cast on for the whole body and the rest of the body is worked in circular rounds. St count will remain the same from this point on and body can be worked to desired length. Then an I-cord BO is worked around the whole hem with a larger needle to avoid cinching the bottom of the cami.
Stitches are then picked up around the sides of the chest and top of the back body, yarn is cut. Then, an I-cord is worked separately to become the first front strap. The I-cord is then joined to the top right of the chest and an I-cord BO is worked along the side of the chest and around the whole body to finish at the other side of the chest along the sts that were previously picked up. The icord is then extended to create the second front strap.
Finally, the back straps are made by picking up sts from the I-cord BO at back and working I-cords.
Straps can be adjusted to tie up at the top (as sample), to be sewn to the back with a crossed back, straight or as a halter top. If making a halter top, it is recommended to make a size that has no positive ease or some negative ease to avoid the back flapping.

THE PATTERN
Get the ad-free, printable, color-coded PDF pattern HERE!
Chest
Using 4 mm dpn and a scrap piece of smooth yarn and provisional cast on, CO4 sts.
Work an I-cord for 51 (53, 59, 65, 69) (73, 73, 73, 77) rows. Place sts on a st holder. Don’t cut yarn.
Change to 3.5 mm circular needle and use live yarn to pick up 51 (53, 59, 65, 69) (73, 73, 73, 77) sts along I-cord (See Pattern Notes for tutorial).
Size 5: Skip ahead to Next WS row to place markers.
P 1 row (WS).
K 1 row (RS).
Sizes (2, 3, 4): Rep prev 2 rows once more.
All sizes - Next WS row: Place markers as follows: P 3 (4, 3, 2, 4) (2, 2, 2, 4), pm, p to last 3 (4, 3, 2, 4) (2, 2, 2, 4) sts, pm, p to end of row.
Then start with lace pattern as follows for the next 16 (12, 10, 12, 12) (8, 4, 4, 4) rows finishing on a WS row:
Row 1 (RS): K to marker, sm, skpo, yo, k1, yo, k2tog, *k3, skpo, yo, k1, yo, k2tog; rep from * to marker, sm, k to end of row.
Row 2 (WS) and every alt row: Purl.
Row 3: K to marker, sm, k1, yo, sl2, k1, p2sso, yo, *k5, yo, sl2, k1, p2sso, yo; rep from * to 1 st before marker, k1, sm, k to end of row.
Sizes (7, 8, 9): Skip ahead to Underarm Shaping after Row 4 (WS).
Row 5: As row 1.
Sizes (3) (6): Skip ahead to Underarm Shaping after Row (10) (8) (WS).
Row 7 - 10: Work 4 rows of Stockinette.
Row 11: K to marker, sm, k4, *skpo, yo, k1, yo, k2tog, k3; rep from * to 1 st before marker, k1, sm, k to end of row.
Sizes (2, 4, 5): Skip ahead to Underarm Shaping after Row 12 (WS).
Row 13: K to marker, sm, k5, *yo, sl2, k1, p2sso, yo, k5; rep from * to marker, sm, k to end of row.
Row 15: As row 11.
Size 1: Cont to Underarm Shaping after Row 16 (WS).
Underarm Shaping
You will now start increasing at each end of all RS rows, while at the same time following the lace pattern, for the following 13 (17, 19, 23, 23) (27, 31, 33, 35) rows finishing with a RS row for a total of 28 (36, 40, 48, 48) (56, 64, 68, 72) sts increased. [79 (89, 99, 113, 117) (129, 137, 141, 149) sts]
Start at Row 17 (13, 11, 13, 13) (9, 5, 5, 5).
As you inc, more sts will be created outside of the markers. When there are 9 or more sts on the outside of the markers, move them over multiples of 8 sts towards the outside of the row during Rows 10/20 and before any Row 1 or Row 11 reps to be able to fit a new lace rep at each end of the row:
Row 1 (RS): K1, M1R, k1, M1R, k to marker, sm, skpo, yo, k1, yo, k2tog, *k3, skpo, yo, k1, yo, k2tog; rep from * to marker, sm, k to last 2 sts, M1L, k1, M1L, k1. [inc 4 sts]
Row 2 (WS) and every alt row: Purl.
Row 3: K1, M1R, k1, M1R, k to marker, sm, k1, yo, sl2, k1, p2sso, yo, *k5, yo, sl2, k1, p2sso, yo; rep from * to 1 st before marker, k1, sm, k to last 2 sts, M1L, k1, M1L, k1. [inc 4 sts]
Row 5: As row 1. [inc 4 sts]
Row 7: K1, M1R, k1, M1R, k to marker, sm, k to marker, sm, k to last 2 sts, M1L, k1, M1L, k1. [inc 4 sts]
Row 9: As row 7. [inc 4 sts]
Row 11: K1, M1R, k1, M1R, k to marker, sm, k4, *skpo, yo, k1, yo, k2tog, k3; rep from * to 1 st before marker, k1, sm, k to last 2 sts, M1L, k1, M1L, k1. [inc 4 sts]
Row 13: K1, M1R, k1, M1R, k to marker, sm, k5, *yo, sl2, k1, p2sso, yo, k5; rep from * to marker, sm, k to last 2 sts, M1L, k1, M1L, k1. [inc 4 sts]
Row 15: As row 11. [inc 4 sts]
Row 17 & 19: As row 7. [inc 4 sts]
Rep Rows 1 - 9 (9, 9, 15, 15) (15, 15, 17, 19). There will be a total of 3 (3, 3, 4, 4) (4, 4, 4, 4) rows of lace flowers. Then cont with Body.
Body
Start of Back
At end of prev RS row, CO 81 (95, 101, 111, 123) (135, 143, 163, 171).
Begin working in rounds by cont on beg of prev row at front. PM to mark BOR and sl BOR at beg of every round. [160 (184, 200, 224, 240) (264, 280, 304, 320) sts total around body]
Rest of Body
Size 1: Knit to BOR (remove front markers as you work), remove BOR, k2, pm NEW BOR.
Size (2, 4) (7): Knit around until 1 st from BOR, (remove front markers as you work), sl1, remove BOR, sl1 back to LHN, pm BOR.
Sizes (3) (9): Knit 1 round, remove front markers as you work.
Sizes (5) (6, 8): Knit to BOR (remove front markers as you work), remove BOR, k (1) (3, 1), pm NEW BOR.
All sizes: BOR placement will stand until next Stockinette section in between lace reps.
Knit for the following 0 (0, 0, 4, 4) (4, 4, 2, 0) rounds.
Start working in Lace Patt at Round 11 (11, 11, 11, 11) (11, 11, 11, 1) making sure that the lace patt matches the prev chest rows.
Lace Pattern
Round 1: *Skpo, yo, k1, yo, k2tog, k3; rep from * to BOR.
Round 2 and every alt Round: Knit.
Round 3: *K1, yo, sl2, k1, p2sso, yo, k4; rep from * to BOR.
Round 5: As Round 1.
Round 7 - 10: Work 4 rounds of Stockinette.
At end of last of 4 Stockinette rounds, move BOR marker 1 st over to the left (i.e. on last round, k to BOR, remove BOR, k1, pm BOR)
Round 11: *K3, skpo, yo, k1, yo, k2tog; rep from * to BOR.
Round 13: K4, yo, sl2, k1, p2sso, yo, *k5, yo, sl2, k1, p2sso, yo; rep from * to last st, k1.
Round 15: As Round 11.
Round 17 - 20: Work 4 rounds of Stockinette.
At end of last of 4 Stockinette rounds, move BOR marker 1 st over to the right (i.e. on last round, k to 1 st before marker, sl1, remove BOR, sl1 back to LHN, pm BOR)
Rep Rounds 1 - 20 until work measures 24 cm / 9½ in from underarms for a cropped cami, 34.5 cm / 13½ in for a hip-length cami or until desired length minus 1 cm / ¼ in of hem.
NOTE: If desired, skip ahead to Straps and Edging and work them while body isn’t yet complete so that you are able to try on the cami and have a better idea of the length.
Hem
When body has reached correct length, BO using a 4-st I-cord BO and a 4.5 mm dpn as your RHN (see Special Techniques).
When there are no longer any body sts left, cut yarn and graft the last 4 sts on your RHN with first 4 sts of the I-cord BO using a tapestry needle.
Straps and Edging

With 3.5 mm circular needles used on body, pick up sts on RS of your work along side of chest and back starting at right top corner of chest (as worn) by picking up end of the chest I-cord and finishing at other end of chest I-cord.
To pick up sts from beg of chest I-cord, undo provisional cast on. To pick up sts from end of chest I-cord, remove st holder.
Cut yarn and place work aside.
Right Front Strap
With 4.5 mm dpn, make an I-cord that is approx. 33 cm / 13 in long.
This I-cord will determine the length of the front strap. If you don’t want adjustable straps that tie at the top, then adjust length of strap now to fit your body perfectly, since this will attach to the back.
I recommend making it longer than you think it needs to be to make sure it will be long enough - you can always unravel the excess off.
Top of Body Edging
Pick up the body of the cami to start working on RS where the sts that were picked up started. Your LHN will be the one with the body sts on it and RHN will be the dpn with the I-cord sts on it.
Slip I-cord sts from right strap onto LHN. Work a 4-st I-cord BO all the way around the top of the cami until next chest corner. You should now only have 4 sts on RHN.
Left Front Strap
Cont elongating the I-cord using only the 4.5 mm dpn to make the left strap until it is as long as the right strap. Bind off strap.
If NOT making adjustable tie straps, skip ahead to Finishing.
Back Straps
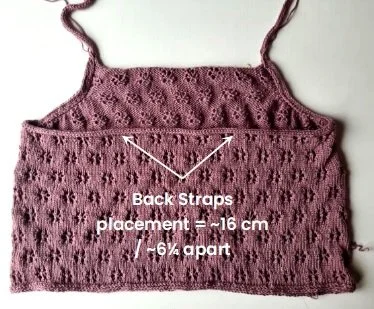
If making adjustable tie straps, then lay garment with back facing up and locate the best placement for the straps (around 16 cm / 6¼ in apart at the middle of the back).
Pick up 4 sts where the first strap will go from the back of the I-cord bind off.

Work a 4-st I-cord until back strap measures approx. 40 cm / 15¾ in. Bind off strap.
Rep for other back strap.
Finishing
If making non-adjustable straps, then attach front straps to back so that they are approx. 16 cm / 6¼ in apart at the middle of the back. You can cross them over or place them straight.
Weave in ends.
Wet block to open up lace pattern.
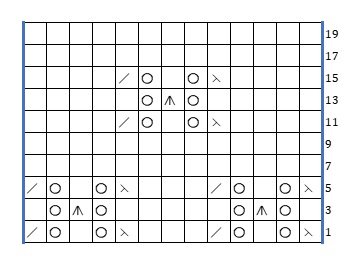
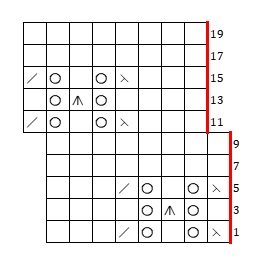
Charts
These charts are to be used as a complement to the written instructions and not on their own.
They are read from bottom-up and from right to left. They show only odd numbered rows (RS rows). When working flat, you will purl all WS rows (even numbered rows) and when working in rounds, you will knit them.
The charts show the lace pattern to be worked in between markers. Rep the boxed area.
In Chart 1, the blue lines show where the markers will fall when working flat.
In Chart 2, the red lines show where the BOR marker will be when working in rounds.
When working the body in rounds, you will move the BOR marker over one st at the beg of each lace section to match where the rep sts start.


From the Designer
Thank you for purchasing my pattern! I hope you enjoyed the process and that your garment fits just right. Please contact me if you have any questions or comments at sandra@nomadstitches.com or head to my Pattern Support Group Nomad Stitchers. For more Nomad Stitches designs, please visit www.NomadStitches.com, Ravelry or find me on Instagram @nomadstitches. And don’t forget to share your finished garment on social media using the hashtags #MyNomadMake and #SnowdropsCami.
To be in the loop and never miss out on new releases, events and exclusive discounts, be sure to join my newsletter.
*This pattern is for personal use. I do not authorize the sale or distribution of the pattern itself or the pictures in it. The finished item may be sold or distributed. However, I ask for it to be recognized as a Nomad Stitches design. Thank you.
Sandra Gutiérrez