Single-Row Mosaic Crochet Tutorial + FREE Pattern + Video
If you are familiar with my work, then you know that I love color and that using new techniques is my jam. For example, I have used a modified version of Tapestry crochet that is worked in the center of simple crochet stitches in projects like my Taroko Sweater and Winter Mountains Mittens. I have also used Intarsia colorwork in my 5th Element Top and my soon to be released Coyoacan pattern.

Coyoacan Top (Released in collaboration with Tramando Latinoamerica soon to be released independently)

Winter Mountains Mittens

5th Element Top

Taroko Sweater
Mosaic Crochet, however, had been the one technique that just sat there, being ignored. To be honest, I thought It would be too complicated! And to make things worse, there’s lots of conflicting information online since there seems to be so many variations of it. Still, I decided that I would figure it out and so I set out to try out a few modifications, until I found my favorite technique for colorwork!
It’s the one I used for my Teotihuacan Pattern.

Teotihuacan Top made in Collaboration with TheFibreCo.
This type of Mosaic crochet is done in rounds and the rules are pretty simple. Actually, scratch that. They are SUPER EASY! Here’s how to work it and a FREE pattern for the Mo-Mo Project Bag to get your fingers and eyes ready for when the new pattern drops!

The Mo-Mo Project Bag - Pattern below
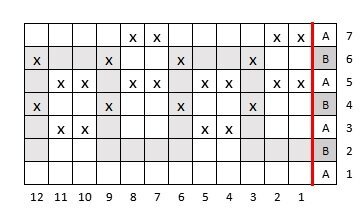
This is what a modified mosaic chart looks like. Not all mosaic crochet look like this, but the ones I make for my patterns do. I will be writing up another post on HOW to modify existing mosaic charts, but for now, let’s learn how to use these.
There are 3 main rules to following these kinds of charts when working in rounds and this single-row variation of Mosaic Crochet. You can keep reading to learn them or just have a look at my video tutorial instead and jump ahead to your FREE pattern. If you would like to purchase the very inexpensive ad-free printable PDF, you can purchase it HERE.
1. Each row of the chart is worked with a single colour.
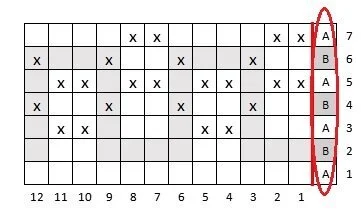
As you can see, the first column shows what color you will work on each row. You DON'T work that column into your project. It's just there for reference.
2. Each empty square represents a scBLO. Each square with an "x" is a dcFLO.
There is no difference between gray and white squares, the shading is there only as a reference for the colorwork effect that will be produced.

3. All scBLO sts are worked in the corresponding st in the row below, as normal. All dcFLO are worked in the corresponding stitch two rows below .
This means that all dcFLO sts will be worked on the last row worked in the same colour as the current row, i.e. a yarn A dcFLO will be worked into the previous yarn A row. And all scBLO will be worked in rows of contrasting colors (the previous row).
That's it. As simple as that. So have a go at this Single Row Mosaic crochet technique in the round with this lovely and simple pattern for a project bag. And don't forget to follow me on Instagram and subscribe to my Newsletter so that you don't miss out on the Teotihuacan pattern release.
The Mo-Mo Project Bag

If you would like to purchase the very inexpensive ad-free printable PDF, you can purchase it HERE.
It's worked bottom up in rounds with NO SEAMING and totally customizable.
Here's what you need:
Yarn in 2 colors. You can use whatever you have in your stash. The thicker it is, the thicker the fabric will be.
Crochet hook. I used a 6 mm for mine, but you can use whatever hook fits your yarn. A small hook with thick yarn will make very sturdy fabric. A bigger hook and/or thinner yarn will make fabric with more drape - so maybe not the best for this kind of project.
A zipper to fit the opening of the bag (optional)
Abbreviations
BLO: Back Loop Only
ch: chain
dc: double crochet
FLO: Front Loop Only
rep from *: work from the first asterisk (*) as many times as indicated.
sc: single crochet
st: stitch
sl: slip stitch
Pattern
BASE
Ch 30
ROUND 1: Starting on the 2nd ch from your hook, sc3 in ch, sc1 in next 27 chs, sc3 in last ch. Turn to work on the other side of the foundation chain, sc1 in next 27 chs, slst in 1st st to join round. [60 sts]
*You need a total that is divisible by 12 in order to fit the chart. So if you would like to make the base bigger or smaller, simply add or substract multiples of 6 to your foundation chain. For example, ch 36. Starting on the 2nd ch from your hook, sc3 in ch, sc1 in next 33 chs, sc3 in last ch. Turn to work on the other side of the foundation chain, sc1 in next 33 chs, slst in 1st st to join round. [72 sts]
ROUND 2: Ch1, (sc2 in next 3 sts, sc1 in next 27 sts) twice, slst to join rounds. [66 sts]
ROUND 3: Ch1, *(sc1 in next st, sc2 in next st) 3 times, sc1 in next 27 sts, rep from * twice, slst to join rounds. [72 sts]
BODY
Follow the chart.
Chart Instructions
Read chart from the bottom - up and from right to left.
Repeat each row around your work, WITHOUT working the column on the right of the red line, a total of 6 times (the number of repeats will change if you modified the foundation chain)
Slst in 1st st to join the round.
Always ch1 with the new color at the beginning of each round.
Each row of the chart is worked with a single colour, alternating between yarn A and B, as indicated on chart.
Each square of the chart represents 1 st; there is no difference between gray and white squares, the shading is there only as a reference for the colorwork effect that will be produced.
All scBLO sts are worked in the corresponding st in the row below, as normal. All dcFLO are worked in the corresponding stitch two rows below – this will be the last row worked in the same colour as the current row, i.e. a yarn A dcFLO will be worked into the previous yarn A row.

If you want your bag to be longer, simply repeat all or a section of the chart.
FINISHING TOUCHES
Weave in all the ends.
Block your work.
Add a zipper if desired.